Drywall, also known as gypsum board or sheetrock, is the industry standard for interior wall and ceiling surfaces. Loved for its affordability, fire resistance, and ease of finish, drywall can transform bare framing into smooth, paint-ready walls. Whether you’re a DIY enthusiast tackling a home renovation or a contractor seeking a refresher, understanding the drywall installation process is key to achieving professional results. Below is a step-by-step overview, along with best practices, common pitfalls, and finishing tips.
Why Choose Drywall?
- Cost-Effective
Drywall materials are inexpensive compared to wood paneling or plaster, and installation is faster—translating to lower labor costs. - Fire Resistance
The gypsum core is naturally fire-resistant, adding a layer of safety to walls and ceilings. - Sound Control
With proper insulation and thicker drywall options (e.g., 5/8″ Type X), you can significantly reduce noise transmission between rooms. - Versatility
Drywall works on straight walls, curved surfaces, and soffits. It can be finished in numerous textures or painted to suit any décor.
Tools & Materials You’ll Need
- Drywall Sheets: Common sizes are 4×8, 4×12, and 4×16 feet; thicknesses vary from 1/4″ (patch work) to 5/8″ (ceilings, fire code).
- Joint Compound (“mud”): Premixed or powder form for taping and finishing joints.
- Drywall Tape: Paper or fiberglass mesh to bridge seams.
- Screws or Nails: 1-1/4″ coarse-thread drywall screws are standard.
- Drywall Screw Gun or Drill: With a depth-sensitive nose to prevent overdriving screws.
- Utility Knife & T-Square: For scoring and snapping panels.
- Drywall Saw or Rotary Tool: To cut openings for outlets and fixtures.
- Joint Knives: 6″ for initial taping, 10″ and 12″ for subsequent mud coats.
- Sanding Block or Pole Sander: With fine-grit paper (120–220 grit).
- Corner Beads: Metal or plastic trims for crisp outside corners.
- Protective Gear: Safety glasses, dust mask, and work gloves.
Preparing the Space
- Inspect Framing
Ensure all studs and joists are plumb, level, and spaced correctly (typically 16″ on center). Tighten any loose framing. - Install Insulation & Vapor Barriers
Add insulation and vapor barriers where needed. Drywall will be the final barrier before paint. - Mark Utilities
Use a stud finder and mark electrical boxes, plumbing lines, and any hidden obstacles. - Cut Panels to Size
Measure wall and ceiling heights, subtracting for flooring or trim height. Score the paper face with a utility knife along a T-Square, then snap the gypsum core away.
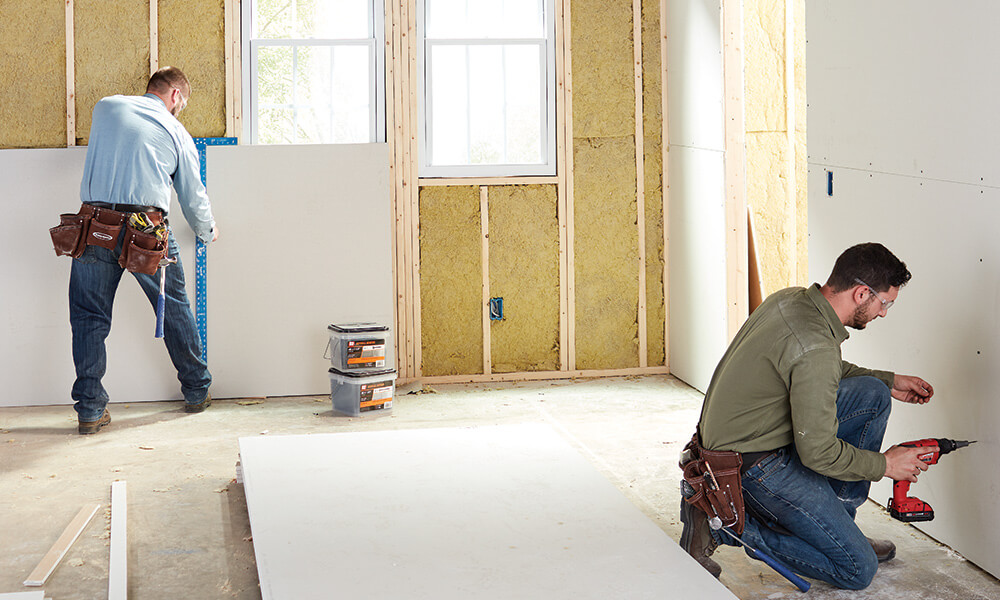
Step-by-Step Installation
- Ceiling First
Ceiling sheets prevent wall seams from cascading moisture downward. Start at one corner, holding the panel in place with braces or a drywall lift, and secure with screws 8–12″ apart along joists. - Wall Panels
Begin at one corner, with the first sheet’s edge flush against a corner bead or stud. Screw along studs every 12–16″. Stagger vertical seams between rows. - Cutting Openings
Transfer electrical box locations by measuring from panel edges, then cut holes with a rotary tool or drywall saw. Test fit and adjust as needed. - Installing Corner Beads
Attach outside corner beads with nails or screws. For inside corners, you can use paper tape only. - Taping Seams
Apply a thin layer of joint compound over seams, embed tape, and smooth out the edges. Let dry 24 hours. - Second Coat
Using a wider knife (10–12″), apply a second, thinner coat of compound over taped seams and beads. Feather edges 6–8″ beyond the first coat. Allow drying time. - Final Coat
A third skim coat fills any remaining depressions. Feather edges at least 12″ from the seam. This coat should be ultra-thin for a smooth finish.
Sanding & Finishing
- Light Sanding: Use a fine-grit sanding block or pole sander. Keep motion steady to avoid gouging.
- Touch-Ups: Spot-prime and fill any pinholes or low spots with a small putty knife and light compound. Sand again once dry.
- Priming: Apply a drywall primer/sealer to ensure even paint adhesion and color uniformity.
- Painting: After primer dries, proceed with your chosen paint—two coats for best coverage.
Common Mistakes to Avoid
- Over-Screwing: Sink screws too deep, breaking paper; skip or leave high, causing lumps. Use a depth-sensitive screw gun.
- Insufficient Taping: Skipping tape at seams leads to visible cracks. Always tape before mudding.
- Rushed Drying: Applying coats before previous layers dry fully causes bubbles and cracking. Patience is key.
- Heavy Sanding: Aggressive sanding can gouge the surface. Light, consistent strokes are more effective.
Expert Tips for a Flawless Finish
- Control Dust: Wet-sand or use a vacuum-attachment pole sander to minimize airborne particles.
- Maintain Clean Tools: Wipe knives between coats to prevent dried compound from creating ridges.
- Work in Good Light: A held-up work light at a low angle reveals imperfections before they become noticeable after paint.
- Hire a Helper: Drywall lifts or an assistant make ceiling installation faster and safer.
Conclusion
Drywall installation combines precise measurements, careful taping, and methodical finishing to achieve those perfectly smooth walls and ceilings. While a novice can handle small repairs or a single wall, larger projects may benefit from professional attention. By following the steps outlined above—choosing the right materials, preparing diligently, applying coats patiently, and sanding thoughtfully—you’ll create a durable, attractive surface ready for any finish. With practice, your drywall skills will grow, paving the way for flawless interiors in every room.